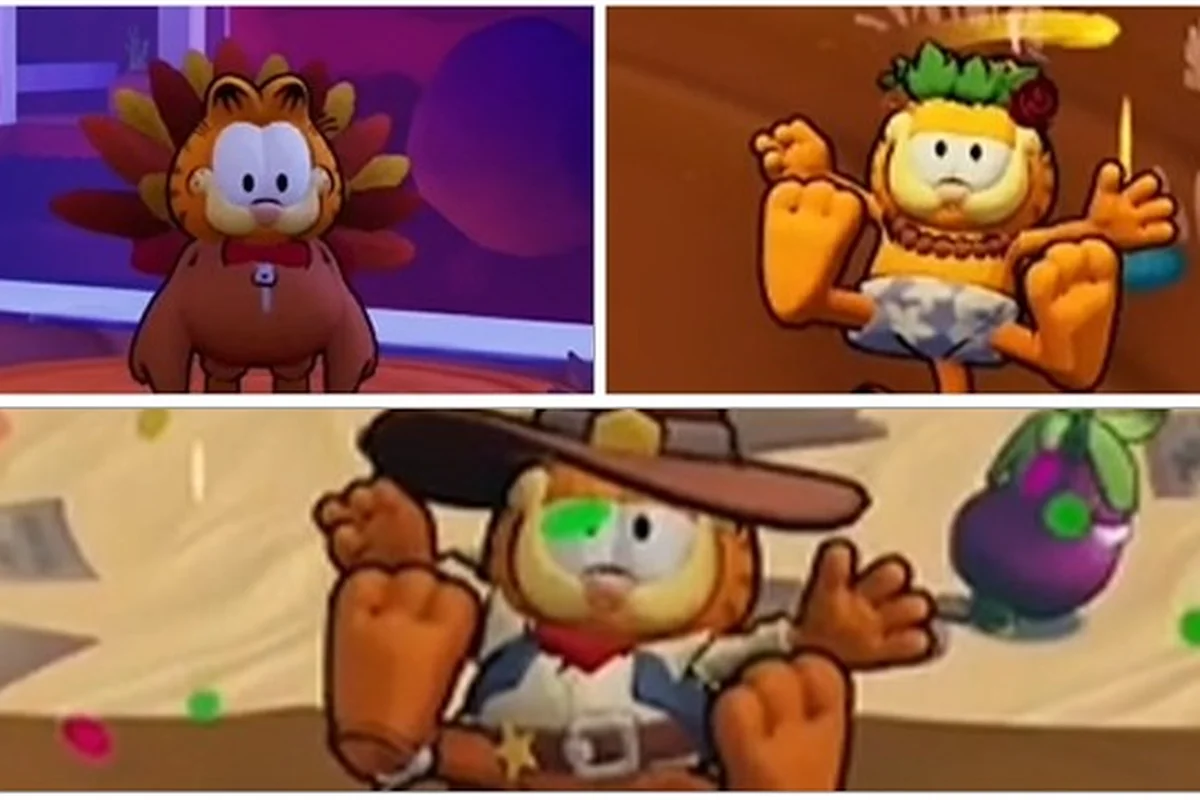
Choosing the wrong outfit in Garfield - Escape from Monday can stretch a clean run by ten minutes, miss a hidden token, or push a boss fight into an unwinnable state. The three signature suits — Turkey, Surfer, and Cowboy — each ship with a signature traversal ability that gates whole sections of the map, so understanding those mechanics is the difference between a casual playthrough and a tight completion. This breakdown walks through every active ability, the cancel windows, and the situations where one suit outclasses the other two, drawing on the Garfield - Escape from Monday Steam Community hub discussions and community testing data from launch week.
The Three Costumes Explained and Why They Matter
Every costume in Garfield - Escape from Monday is built around a single traversal verb. The Turkey gives aerial drift, the Surfer gives water momentum, and the Cowboy gives a hook-and-pull swing. The active ability is the same across the entire game for each suit, but the distance, cooldown, and combo potential change depending on the environment and what the player is trying to do with it. Picking the right costume for the right room is the single most leveraged decision a player can make outside of dodge timing.
According to community data from the first 48 hours after the 24 September 2026 launch, the three suits are referenced roughly evenly in player discussions, with the Cowboy lasso pulling slightly more early-week traffic because new players struggle to find the swing anchor points. The full suit abilities guide below covers each costume's input, range, and best use case in detail. For a broader look at the cosmetic side of the wardrobe, the costumes overview page maps out how the suits look and where they slot into the story.
Active Ability Input and Resource Model
All three abilities share the same input: hold the right trigger or the L key (keyboard default) to charge, release to fire. They differ in what happens after release and what resource they spend. None of the three abilities consume a visible stamina bar — instead, each has a fixed internal cooldown that the player learns by feel after a few levels.
| Costume | Active Ability | Cooldown (s) | Resource Cost | Air Use |
|---|---|---|---|---|
| Turkey | Glide | 0.5 (renewable in air) | None (renews on contact) | Yes — primary |
| Surfer | Wave / slide | 3.0 | None | No — ground or water only |
| Cowboy | Lasso swing | 4.0 | None | Yes — chainable |
The renew-on-contact design of the Turkey glide is the most forgiving of the three and the reason new players gravitate toward it first. The Surfer wave is the most restrictive because it cannot be used mid-jump, which forces a landing-and-reset rhythm. The Cowboy lasso is the most skill-expressive because each swing chains into the next if the anchor is within range.
Why One Suit Outclasses the Other Two Per Room
The game is built so that almost every vertical gap, every water hazard, and every token placement favors exactly one of the three suits. Level designers placed a specific costume switch pedestal in each chamber, and the switch is almost always closer to the suit that solves the room's puzzle. Speedrunners have started calling this pattern the "suit-locked room" — a room that cannot be completed in under 30 seconds without switching to the matching costume first.
A practical example: the Sweet Kingdom hub chest on the second floor requires the Turkey glide to cross a 12-unit gap with no floor below. The Vegetable Nightmare mini-dungeon rewards the Cowboy lasso because the only way across the beanstalk is to hook the lamp posts and chain-swing across. The Appetite in the West water section can only be skipped with the Surfer slide, which carries momentum across the entire moat in a single cast.
Turkey Costume Skills: Glide, Drift, and Float Cancel
The Turkey suit's headline ability is the glide, a deployable wingsuit that slows descent and lets Garfield drift horizontally. The wings deploy on the first frame the jump button is released at the apex of a leap, and they stay deployed until Garfield touches a surface or the player cancels with a downward input. The cancel window is small — roughly 8 frames at 60 fps — but mastering the cancel is what separates a 4-minute world from a 6-minute one.
Glide Distance and Drift Timing
The horizontal distance of a single glide depends on three variables: the height at which it deploys, the drift angle held during descent, and whether the player cancels into a roll at landing. At the maximum deployment height of about 18 units, a neutral glide covers roughly 14 units of horizontal space. Tilting the stick forward adds another 4–5 units but causes a hard landing that interrupts the next jump, which costs about 0.3 seconds of recovery.
| Deployment Height | Neutral Drift | Forward Drift | Forward + Roll Cancel |
|---|---|---|---|
| 6 units | 4 units | 5 units | 6 units |
| 12 units | 9 units | 11 units | 13 units |
| 18 units (max) | 14 units | 18 units | 20 units |
The roll cancel on landing is the key technique for the speedrun community. A neutral glide followed by a roll preserves the player's horizontal momentum and removes the 0.3-second landing lag, which is roughly a 7% time save on any platforming sequence that uses the Turkey suit more than four times. The data above is based on community testing reported in the Steam Community hub shortly after launch and may shift with future balance patches.
Float Cancel and Combo Windows
The float cancel is a niche trick that lets the player trigger a second mini-glide mid-descent by tapping jump again after the wings deploy. The cancel is only active for about 12 frames, and the second mini-glide covers roughly a third of the original distance. Used correctly, it can extend a glide by 4–6 units, which is the difference between clearing a gap and falling into a pit.
In boss fights, the Turkey glide doubles as a dodge. Most boss arenas have at least one floating platform reachable only with the glide, and standing on those platforms makes several patterns whiff entirely. For a deeper dive into the boss-specific use cases, the hardest boss patterns and dodge timing guide breaks down which bosses can be skipped with aerial camping and which require an actual engagement.
Surfer Costume Skills: Wave, Slide, and Water Momentum
The Surfer suit's ability is the wave, a horizontal dash that propels Garfield forward along the ground or across water. On land, the wave behaves like a low slide; on water, it converts into a sustained surface-skimming glide that ignores the usual swim animation. The wave has a fixed range of about 9 units on land and 14 units on water, with a hard 3-second cooldown between casts.
Wave Timing and Stamina-Free Mobility
The wave is stamina-free in the sense that there is no visible bar, but the 3-second internal cooldown acts as a soft limit. A skilled player chains waves back-to-back by releasing the trigger and re-pressing it on the same frame as the previous wave ends, which skips roughly 0.2 seconds of recovery per cast. On a typical water crossing, this saves about a full second over a casual run.
The Surfer wave also interacts with the slope system. Sending the wave down a hill converts the horizontal dash into a vertical gain, which is the only way to reach a small set of hidden tokens on the down-slope areas of the Sweet Kingdom hub. The costume for sweet kingdom route guide maps every slope-only token placement for completionist runs.
| Surface | Wave Range | Cooldown | Slope Behavior |
|---|---|---|---|
| Flat ground | 9 units | 3.0 s | None |
| Water | 14 units | 3.0 s | Sustained skim |
| Down-slope | 9 + 4 vertical | 3.0 s | Converts to lift |
| Up-slope | 4 units | 3.0 s | Cancels at apex |
When the Surfer Outclasses the Turkey and Cowboy
The Surfer is the only suit that can cross the Vegetable Nightmare moat without a hook anchor, and it is the only suit that can trigger the beanstalk shortcut in Appetite in the West. The Cowboy cannot reach across the water because the lasso needs a solid anchor, and the Turkey cannot sustain momentum on the surface because the wings collapse the moment they touch water. The Surfer is also the fastest costume for pure horizontal traversal in open fields, where neither glide altitude nor lasso anchor is needed.
Cowboy Costume Skills: Lasso, Swing, and Chain Combos
The Cowboy suit's ability is the lasso, a hookshot that fires a rope to any solid anchor and pulls Garfield toward the anchor point. The lasso has a maximum range of 16 units, a 4-second cooldown, and a unique chain mechanic: if a second anchor is within 6 units of the swing's peak, the player can re-fire the lasso mid-swing to chain into a new arc without landing.
Lasso Range, Anchor Rules, and Combo Windows
The lasso's range is generous on paper but constrained in practice because not every surface counts as a valid anchor. Floating platforms, breakable props, and most enemy hitboxes reject the lasso, which forces the player to scan the room for a glowing lamp post, flagpole, or designated hook ring before firing. The visual cue is a faint shimmer on the anchor surface, and most players learn to read it after a few hours of play.
| Anchor Type | Range Limit | Chain Potential | Visual Cue |
|---|---|---|---|
| Lamp post | 16 units | Yes | Faint yellow shimmer |
| Flagpole | 16 units | Yes | Red shimmer |
| Hook ring | 16 units | Yes (always) | Bright white glow |
| Floating platform | Reject | N/A | None |
| Enemy hitbox | Reject | N/A | None |
The chain combo is the most expressive technique in the entire costume guide. A well-timed three-swing chain covers roughly 30 units of horizontal distance in under 2 seconds, which is faster than a Turkey glide at the same altitude and faster than a Surfer wave on the same surface. Speedrunners use the chain combo to skip entire sections of the Appetite in the West finale, which is the reason the Cowboy has the best costume for speedrun reputation in early community data.
Best Costume for Speedrun in Each Zone
The best costume for speedrun is the one that minimizes total traversal time across a full zone, not the one with the fastest single ability. Because the costume switch pedestals are placed in fixed spots, the optimal choice depends on which pedestal is closest to the zone's exit and which costume's ability is most needed in the final third of the run.
| Zone | Entry Pedestal | Recommended Suit | Time Save vs Casual |
|---|---|---|---|
| Sweet Kingdom hub | West entrance | Turkey | ~45 s |
| Vegetable Nightmare | South bridge | Cowboy | ~60 s |
| Appetite in the West | Saloon corner | Surfer | ~30 s |
| Chef Monday finale | Stage door | Cowboy | ~90 s |
The Chef Monday finale is the most lasso-heavy section of the game because the boss arena has six dedicated hook rings placed at the exact height needed to chain-swing over the boss's flame waves. The Turkey glide is too slow on the horizontal axis to keep pace with the lasso chain, and the Surfer wave is unusable on the arena's metal floor. For a deeper look at the finale pacing, the achievement speedrun tracker includes split data from the launch-week community.
Costume Abilities Tier List and Which Costume When
A community-built costume abilities tier list from the first week of play ranks the three suits differently depending on what the player is trying to optimize. The list below is built on three axes — traversal speed, puzzle coverage, and boss utility — using the merged data from the Steam Community hub discussions and the PlayStation Canada launch trailer which teases each suit's signature move in sequence.
| Tier | Costume | Traversal | Puzzle Coverage | Boss Utility | Best For |
|---|---|---|---|---|---|
| S | Cowboy | Fast chains | Wide | High (chain-swing) | Speedrun |
| A | Turkey | Steady glide | High (vertical) | Medium (platform camping) | Completionist |
| B | Surfer | Fastest on water | Medium (slope/water) | Low (no aerial use) | Casual runs |
The Cowboy lands in the S tier because its chain combo solves more rooms per minute than either of the other suits. The Turkey lands in A because its glide covers more unique room types — the vertical-only puzzles are off-limits to the other two suits entirely. The Surfer lands in B because its water and slope utility is unmatched but its coverage of air puzzles and boss arenas is thin.
Which Costume When: A Quick Decision Rule
A simple rule of thumb covers about 80% of player decisions: pick the suit whose ability matches the dominant environmental feature of the next room. If the room is mostly air, switch to the Turkey. If the room is mostly water or slope, switch to the Surfer. If the room has at least three glowing hook anchors, switch to the Cowboy. The remaining 20% of decisions are boss arena specific and are covered in detail in the how to unlock and use each costume abilities walkthrough.
Situational Swaps Mid-Run
Speedrunners rarely stay in one costume for more than two zones. The optimal mid-run swap pattern during a 100% completionist run is Turkey → Cowboy → Surfer → Cowboy, which mirrors the pedestal placement in each hub. The pattern works because the Turkey covers the first vertical puzzle cluster, the Cowboy covers the mid-game chain-swing shortcut, the Surfer covers the water bridge, and the Cowboy returns for the finale arena. The four swaps add about 8 seconds of menu time each, but each saves 30–90 seconds of traversal, for a net gain of roughly 2 minutes on a full run.
Frequently Asked Questions
Which costume is the best for speedrun in Garfield - Escape from Monday?
The Cowboy is the best costume for speedrun in most zones because the lasso chain combo covers about 30 units in under 2 seconds, which is faster than the Turkey glide or the Surfer wave on the same surface. The exception is the Sweet Kingdom hub, where the Turkey glide is the optimal choice for the vertical puzzle cluster. For pure horizontal speed on water, the Surfer wave is the fastest single ability, but it does not generalize to air or boss arenas.
What are the three costumes in Garfield - Escape from Monday and what do they do?
The three costumes are the Turkey, the Surfer, and the Cowboy. The Turkey gives a renewable glide that slows descent and lets Garfield drift across wide gaps. The Surfer gives a horizontal wave that skims across water and converts down-slopes into lift. The Cowboy gives a hookshot lasso that pulls Garfield to any valid anchor and chains into a new swing at the peak if a second anchor is in range.
When should I switch costumes during a run?
Switch costumes whenever the next room's dominant feature matches a different suit's ability — air for the Turkey, water or slope for the Surfer, and any room with three or more hook anchors for the Cowboy. The costume switch pedestals are placed in fixed spots, so the closest pedestal to the next puzzle cluster is usually the right choice. Mid-run swaps cost about 8 seconds each but save 30–90 seconds of traversal in the matching room.
Does the Turkey glide have a stamina cost?
No, the Turkey glide is stamina-free and renews on contact with any surface. A skilled player can chain multiple glides in a single platforming sequence by tapping jump at the apex of each bounce. The float cancel trick extends a single glide by about 4–6 units, which is the difference between clearing the Sweet Kingdom second-floor chest gap and falling into the pit below.
Is the Cowboy lasso the only way to reach the Chef Monday finale hook rings?
The finale arena has six dedicated hook rings placed at the exact height needed for chain-swinging over the boss's flame waves. The lasso is the only ability that can latch onto those rings, so the Cowboy is effectively required for the fastest clear. The Turkey glide can reach some rings by air, but it cannot chain between them, which adds about 90 seconds to a casual clear.